Thursday, December 23, 2010

Harvest Trolley - dimensions

An update on re-sizing the trolley. I like the way it is of the prototype, but my friend P'Wah think it should be more compact. The proposed dimensions are:

1. Platform size: 0.8m x 0.8m
2. Platform height: 1.5m, adjustable in 10cm step to 1.7m
3. Base 1m x 1.5m
4. Wheels size: 6" (as suggested by Justin)

This is what it looks like: (man height in drawing is 1.67m)
N.B. The cross braces are left out of drawing.


Any further comments or feedback?

Another helpful feedback from Justin - for a wider wheel base. Thanks for the illustration too.


This can be DIY build with angle iron available from local hardware stores (as our prototype). We find it cumbersome to move it for use between floors. So our preference is to build with aluminum, to be light and easy to disassemble.

Alternatively, each floor can have a trolley and move only the motor drives. If you need motors & control, please PM me at chng.charles@gmail.com

Tuesday, December 21, 2010

Thoughts on future direction of this blog


This blog has been in existence for slightly over 2 years now. It served as a channel to share some of my thoughts and activities. The future path is to find new and better ways to improve the operations and management of bird houses - tried and tested solutions along with proven products shall be featured here.

In my view, there are many myths & half truths propagated out there in cyberspace. An example is the selection of tweeters; not many folks can tear through some of the technical spin around it. The best choice is to derive from real experiments with birds, not merely based on technical discussion & specs. This is certainly one subject I would investigate further with comparative tests.

What's more? I intend to convert solutions into products such as the motorized trolley in development.

What's the intention? I am setting up a fund in aid of building a technical school in Sangklaburi, a remote town near the Thailand & Myanmar border. This is not my personal project but would contribute some efforts to its realization. Profits derived would be channel towards this cause.

Some may have come across this in my other blog:
http://my-swiftlet-farm.blogspot.com/2010/11/visitor-on-special-mission.html

If you like to find out more, please visit these blogs:
The fund raising walk:-
http://walkforeducation.wordpress.com/

The Technical School Project:-
http://prsarkartechnical.wordpress.com/

I hope that if you find my blog informative & useful, be kind enough to contribute too. In return I offer services in areas of my competency.

Bird nest harvesting trolley test drive

Having given the battery a new charge, the motorized trolley was rolled out for a test drive.

Here you see my friend P'Wah took it through various paces - forward, turning & reverse movements. He seem pleased & me too!


We would develop it further as a "knock-down" version for ease of transport & assembly. Your inputs to its refinement are most welcome. Our primary objective is a convenient & safe platform to work on.

Sunday, December 19, 2010

Bird nests harvesting trolley

Well, my motorized trolley has finally got off the drawing board!
Designed for dual purpose in mind - bird nests harvesting & to inspect/service the sound system.

It is timely as a friend fell off the ladder while harvesting bird nests 2 weeks ago. He simply mounted a ladder on wheels and has been using it for a long time! It never appear safe to me however. One day his son pushed a little too hard accidentally and he lost balance at the top. He jumped off and had a bad landing - broke his leg and shoulder blade. Seem like Murphy's law repeating itself again - "If it can go wrong, it will eventually!"

The prototype is built with angle iron for ease of assembly. Though designed for one, it can actually accommodate 2 persons. A shelf is added to place tools when used as a working platform. A commercial version will be develop next.


The motors (with reduction gears) are driven by 12V car battery. Photo showing the universal coupler connecting the motor & wheel.


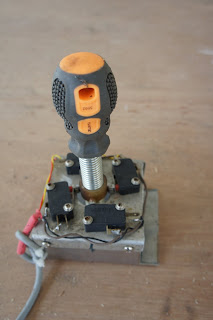
The joy-stick with micro-switches arrangement for directional control - forward, left, right & reverse. I've found an industrial grade version for the final design.


Look forward to its test drive on video next.

Tuesday, November 16, 2010

Listening devices to check out the tweeters

I've been using PVC pipes of various lengths to check out the tweeters high on the nesting planks. This is a commonly used method by many I presume.


Recently I was checking some wiring up on a ladder close to the tweeters and I find a rigid tube (the short one pictured above) rather cumbersome. Then came the idea in a bathroom - using the shower hose; not exactly an "Eureka" discovery an idea but one that is pretty neat. I took it down and attached a cut-off cone section of a milk bottle at the other end - there you see below. Still a little cumbersome in use up on a ladder, but much preferred.


Then the other day I happened to walk past this forgotten toy left on a bench and can't resist to take a photo of it. Hmmm... seem like a better tool only if the connecting tube is longer.


Too bad it is not mine, so I can't check it out! Any doctors out there has a spare one?

Saturday, March 13, 2010

Cleaning Bird Nests - Part 4

Lately I made another improvement to my "bird nest rinsing kit".

A little background: Previously the water pump injects water towards the middle (looking from above). Water hit the tumbler wall and forced upwards creating convection circulating currents. After cleaning a couple of bird nests, I noticed a dead spot (at opposite end to the overflow outlet) was trapped by eddy currents at the surface. Fine feathers trapped here were not flushed out.

What's the solution?
This is resolved by off-center the pump in order to inject water circumferential to the tumbler wall shown below: (I sourced for a more compact container that fits the tumbler & pump nicely now)


The result now is water circulate upwards with a spiral motion. It also spins the bird nests within - like a washing machine! So I am quite happy with this set-up now.

Some skill required to cut an oval hole of the right size. Handy people out there can surely do it quite easily.

Perhaps I shall rename it as "A Bird Nest Washing Machine"! ;o)

Friday, January 22, 2010

How dark should the bird house be?

How dark should the nesting areas be? This is a subject I've always been curious about.

Some people would say not too dark, birds need some light to go about their business during the day. Dark enough while you can still see some outlines of the columns, beams, walls or whatever.

Many "consultants" publicly claims light levels should be less than 1 lux; while some say less than 2 lux. Recently I learned that 10 lux is OK too!

So when you ask different people you get different answers. Well what is correct? May be there is no "one answer" - unfortunately we can't ask the birds! May be it is not such a crucial factor.

To begin with, how bright is 2 lux or 10 lux? So I finally decided to get a lightmeter. It is "good to have" and not a "must have" I think.

At least now I have an instrument to make measurements & obsevations to form my own opinion.

Thursday, January 21, 2010

Bird nest harvesting tool

While visiting one of my friend's farm last weekend, I was shown this custom made harvesting tool made of stainless steel. It is a very nice tool.

Attached to a telescopic pole, nests can be harvested from the floor level.


The 2-wire cavity collects the nest after removal from the nesting plank; similar to picking mangoes!


Neat isn't it?

Wednesday, January 20, 2010

Keeping owls out

One way to keep owls away is to electrify the entrance preventing them to stand & inspect at entrance hole prior to entering.

This is the set-up at my friend's bird houses. The steel wires are electrified through an isolation transformer. Small PVC pipes provides support and stand-off from the concrete wall.

Monday, January 11, 2010

Use of fake nests

Use of fake nests is a proven technique. Recently I used it to encourage to birds to populate "vacant" areas in one of my bird house. In this case it is a floor with few nests.

I tried both fake plastic nests and Styrofoam pads.


Of course the first signs are birds droppings. When new dropping increases all the time, its a good sign.


Soon some visible marking of bird nest added to it followed by eggs. In this instance, the preference of the fake nest over the foam pad.


Shown hatched to chicks.


The two chicks of the 2 eggs nest.


This is the single egg nest.


Not all are populated yet, but the results are encouraging.

I might have scared some off during the frequent checks - so the lesson of don't over do it.

Saturday, January 9, 2010

Cleaning Bird Nests - Part 3

Recently I assembled a cleaning kit using off-the-shelve parts from a department store. So anyone can practically do the same.

Shown below is a water jug holding a wire mesh sieve at mid level where the bird nest is placed. A small aquarium pump (hidden from view) pumps water up till it overflows continually into the filter-cup (one I collected from iced coffee stall).

Both are seated in a larger plastic container. The amount of water is added till the flow rate is stabilized and overflow directed via the tappered end of the jug.


Well, I've tried out this new arrangement and quite happy with it. There are still some stubborn hairs trapped with some parts of the nest. It is quite easy to remove them after rising. At least I no longer labor over picking fine hairs from now on!

Friday, January 8, 2010

Using your car stereo for bird calls

I often like to do bird calls as I travel around; just to sample the birds feeding in the area.

This is one convenient way to do it - I always keep a horn tweeter and a pair of wired crocodile clips handy. Remove the plastic cover on the door tweeter and connects across it in parallel.

Simply play bird call CD on the car stereo and orientate the tweeter in the direction you like. It is even better to mount the tweeter on a small camera tripod.


So there is no need to carry a purpose-build test kit.

I even keep all doors open to let the sound out from other tweeters/speakers - have fun watching the birds coming by!